Posts

Showing posts with the label refashion

6 Squares - 6 easy DIY Tops!

Image
We are going to make not 1 but 6 tops (or as many as you want of course;)! Don't be afraid to pick your best/prettiest leftover, handkerchief or tea towel, the tops are easy to make!:) Needed: Squares! A fabric that can be made into a square...use a tea towel and fold it in a square to get the basic size. Cords and/or elastic (check what you need for the version you want to make). Extra: maybe some rushing or lace or other trimming material, elastic, trimming will go much faster with a sewing machine but if trimming is already done (handkerchief) it's doable by hand, basically add whatever you have or want to finish of the look:) 1.  2. 3. 4. .5   6. WARNING: It's very addictive! Because it's so easy and looks so good and every style and fabric make it a whole new look. Make them all and more if you want ;) ,but i can suggest to start with nr.1, just to get the hang of it.  Just choose a version and follow the instructions...and Enjoy...

Scarf to Beachdress II

Image
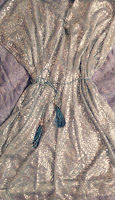
Again, start looking if you have some scarfs at home that you don't wear a lot, or you can go to the market and find the right size, texture, color and  pattern. Make sure the fabric is not too fragile. You can test it by pulling it out a bit and see if it already unravels. Anyway, lets get started! Don’t be shy, just try;) 1. Show your face Take a scarf that is broad enough to cover your width and fold the length double to see how long it is. If it's long enough you can use it! But not to worry if it's not long enough you can still make it into a caftan top!:) Fold it double (insides/ugly sides inside) and make a small incision where the head is going to be. Then perfect the shape and depth of the neckline and trim it. 2. Follow your lines Sew (on the outside of double folded scarf!) a straight line or (if you want it to have a smaller waist already) a slightly inwards line. Make sure it will not be to tight and that you don't go to hig...

Poudy sheet to proud pouch

Image
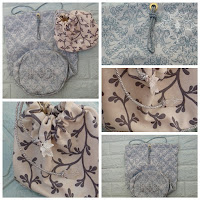
Sorry! This project turned out to be a little less easy then others...    Use old sheet or tablecloth or curtain or...whatever big leftover you have. The bigger the leftover...the bigger the bag, or the more bags you can make;) 1. Leftover puzzling Depending on the amount&shape of your leftovers, and whether or not you want a different fabric for the bottom, choose which pattern/combination you want to use. Start by drawing a circle or oval (use things around the house that have right shape) and trace the shape onto double folded fabric (with cardboard or foam or something in between for extra sturdiness if wanted) Cut circles a bit bigger (just the firming material can be cut as drawn/traced). Decide the height of the bag and cut at least 5 cm bigger/longer. The length is determent by the size of bottom shape. To measure: use a piece of string and trace along the shape, then lay next to fabric and add some trimming space. Trim the sides and bottom leaving e...

Jeans to raggedy shorts

Image
This is a "refashion/upcycle" project so we start with some normal length jeans or a boring jeans shorts. We are going to trash them to be able to save them... Make sure it still fits;) or try to make it a bit bigger first by taking away the thread in the sides and putting it back together using less fabric to fold inwards. Needed: some sandpaper (tiny peace is enough!) and/or cheese scraper and whatever else you might want to add (lace, iron on emblems, or pocket applications etc) Ok, Ready to say goodbye to the boring old jeans and get ready for a delicious summer? 1. The unraveling/revealing Cut the jeans at your preferred length (tiny bit longer for unravelling) and start to use your fingers and some tiny scissors to make the bottom unravel and look raggedy. If its going to much or you're scared it might get too much then stitch shortly above. 2. Demolishion time Now take the sandpaper and start making movements (check what works best sideways or ...

Bring your old blouse into the 21st Century!

Image
This project is based on using a blouse you already have wasting in the back of your closet..if you don't know such a blouse and find nothing in the back of your closet you can of course buy one that would be just perfect for this project... Make sure to check variation tips on bottom of the page! I'm making two different blouses in three different steps. Decide what you want first and then use the most fitting explanation:) 1. Cut out the past Version 1 & 2 Take the old blouse and lay it on floor or table. Cut where needed and make sure to leave some trimming space (or add borders) and try to keep the existing trim line when possible! 2. Sewing it back to life Version1 Trim all the edges (also along both sides of our long strip unless you want to use a different fabric). Then attach the strip along each side of the neckline leaving enough length to make a bow. Version2 Tim all the edges and remove buttons from bottom part (if you want a small bow...

From scarf to magical beachdress!

Image
It's one of the easiest DIY projects whith amazing results! Don't be shy....just try!:)     Maybe you have some scarfs at home that you don't ware a lot, or you can go to the market and find the right size and pattern:) Either way, lets get started! 1.   FOLDING  Take a scarf that is broad enough to cover your width and fold the length double to see how long it is. If it's long enough you can use it! But not to worry if it's not long enough you can still make it into a caftan top!:) 2. CUTTING  Find the middle (where your neckline is going to be). Then make a tiny cut. Later decide the front and cut a v line as deep as you prefer:) Always best to start small and pay attention to cutting straight! This way you can keep trying it on and add more neckline when/where needed. 3. SEWING  Sew the neckline all around to hide the cut marks. And add any kind of hem you would prefer. (even jewelry! or another scarf! or lace!) Then put the ...