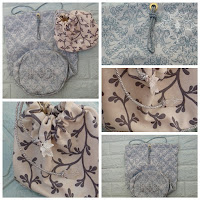
Poudy sheet to proud pouch
Sorry! This project turned out to be a little less easy then others...

Use old sheet or tablecloth or curtain or...whatever big leftover you have.
The bigger the leftover...the bigger the bag, or the more bags you can make;)
1. Leftover puzzling
Depending on the amount&shape of your leftovers, and whether or not you want a different fabric for the bottom, choose which pattern/combination you want to use. Start by drawing a circle or oval (use things around the house that have right shape) and trace the shape onto double folded fabric (with cardboard or foam or something in between for extra sturdiness if wanted) Cut circles a bit bigger (just the firming material can be cut as drawn/traced).
Decide the height of the bag and cut at least 5 cm bigger/longer. The length is determent by the size of bottom shape. To measure: use a piece of string and trace along the shape, then lay next to fabric and add some trimming space. Trim the sides and bottom leaving extra space on top (to create the tunnel later).
2. No strings attached
Make a hole in the middle (front) or on two sides. (place ring or sew edges). Then place the cord on the fabric and make a loop go out of the hole(s). Sew the tunnel to the inside and trim edges. Now you can add pockets, start beading or add other decorations before sewing it all together.
3. Get it together
Start pinning the outside of the circle to the outside of the bottom making the full circle complete. Check if it's smooth and even and if all parts would look good inside out. Then sew the parts together! :) Finally! we have a bag! Cut the tunnel cord at wanted length. If preferred add handle on the sides (leaving tunnel and cord free). Hide the stitch/fold lines and accentuate the bottom shape by stitching on a cord at the bottom on the 'good'/out- side. And add some decorations or tassel's at the ends of the tunnel cord and start putting your stuff in!:D
(I thought it would be easier to make the bag out of 1 peace and sew by hand...i was wrong :Y: so believe me..this is the easiest way!)
Hope you enjoyed the challenge and most of all; Hope you now proudly want to carry your transformed leftovers everywhere! :)
More inspiration down here v and be sure to share your version on fb and instagram #1nici_diy
- - - - - - - - - - - - - - - - - - - - - - - - - - - - - - - - - - - - - - - - - - - - - - - - - - - - - - - - - - - - - - - -
Extra inspiration
Themes: Romantic, Sparkling, Bohemian, Colourful, Mexican, Sweet, Flowers, Shapes, Love, Contrast, Aztec, black&white etc.
Materials: Sheet, Curtain, pillowcase, Cotton, Lace, Wool, Rope, Cord, palettes, Chains, Beads, Leather, Braided cords, Fringes, Feathers, Charms, Buttons, Rhinestones etc.
Other: Different length, different material on inside and or bottom, Embroidering name or shape, wider or smaller top part, adding rings for different handles, let cord come in and out of tunnel etc.


Comments
Post a Comment
Feel free to comment or upload your unique version!:) ...